Pan Fried Soup Dumplings
Rated 3.9 stars by 29 users
Category
Dumplings
Author:

Ingredients
The jelly
- 300 grams of pork skin
- Enough water to blanch the pork skin
- 1.5 tbsp of Chinese cooking wine
- 5 slices of ginger
- 3 pieces of spring onion
- 8 cloves of garlic
- 6 cups of water
The filling
- 350 grams of ground pork
- 1 + 1/4 tsp of salt
- 1 tbsp of soy sauce
- 1 tsp of sugar
- 1/4 black pepper
- A drizzle of sesame oil
- ginger and garlic water 4 slices of ginger + 4 cloves of garlic + 1/2 tbsp of Sichuan peppercorn + 1/4 cup water
- 150 grams of small peeled shrimp seasoned with 1/4 tsp of salt and 1/4 tsp of black pepper, 1 tsp of olive oil, 1/8 tsp of baking soda.
- 1/2 cups of diced spring onion add right before making the buns
- The pork skin jelly we made before
For the skin
- 400 grams of all-purpose flour
- 1/2 tsp of yeast
- 220 grams of warm water
- 1/2 tsp of salt
For the sauce
- 1 part of light soy sauce
- 2 parts of white vinegar
- some thin ginger strips
For garnish
- spring onion
- toasted sesame seed
Directions
FOR MAKING THE JELLY
The jelly broth is the key ingredient for this recipe. It can set in the fridge and you can wrap it into the dumpling. When you cook it, it melts into a delicious broth. You want to make this one day early because it is the time-consuming part.
- You will need 300 grams of pork skin. If you don’t want to cook with pork, you can use beef tendon, or even gelatin powder will work. The ratio is different. l included that in the video.
- Put the skin in a big pot. Add enough water to cover it. Bring this to a boil. You will see some impurities floating on the top. That is what makes pork skin smells awful. We gonna get rid of that by washing it under running water.
- Give the pork skin a check to see if there is any attached hair. My pork skin came pretty clean. If yours has it, you can scratch it or burn it. You also want to trim off any excess fat because we don’t want our broth to be too oily.
- Cut the skin into smaller pieces which will help the gelatin dissolve into the liquid faster. Add it to a clean pot, along with some Chinese cooking wine, spring onion, ginger, and garlic. Pour in 6 cups of water. Bing this to a boil. Turn the heat to low. Let it simmer for 2 hours.
- 2 hours later, the skin should be completely soft that you can easily break it apart with chopsticks. The broth should have a milky and creamy texture. It is very thick and velvety. Even though I show how the broth should look like, it is still quite hard to know if it is good enough to be set in the fridge. Here is a great way to test. Dip a spoon into the broth and put it in room temperature for 5-8 minutes. You should see that the thin layer of broth attached to the spoon is already started setting. That is the gelatin is forming up, which means your broth is good to go. My room temperature was 14 C / 57 If you live in a hot place, you can put it in the fridge to test.
- Let the broth go through a sieve and get rid of the solid part. You should have about 2 cups of broth left. If you don’t have enough, you can add some water to it. If you have too much liquid, you can always put it back on the stove and reduce it.
- Pour the broth into a container. A plastic wrap will help you take out the jelly easily. Let it sit in the fridge for at least 6 hours so it has enough time to form up.
THE FILLING
I like to make aromatic water for the filling. Just simply blend 4 cloves of garlic, 4 slices of ginger, 1/2 tbsp of Sichuan peppercorn, and 1/4 cup of water together. Let it go through a sieve and get rid of the soli part.
- In a big container, add 350 grams of pork, the aromatic water, 1 tbsp of soy sauce, 1 + 1/4 tsp of salt, 1/2 tbsp of sugar, 1/4 tsp of black pepper, and a drizzle of sesame oil for some nutty taste.
- Mix the filling until all the liquid is gone. Then stir the meat within one direction for 5-6 minutes. Also, you can bring the filling to a high position and through it back to the bowl. This will create a better texture for the dumplings. Set that aside.
- If you made the jelly one day ahead, by now, they should be ready. Take it out and roughly cut it first. Then mice it. You want to do it as fine as you can so you will have an even mix filling. Also, you want to do this fast because if your room temperature is too hot, it will start melting. Feel free to put it back in the fridge if it starts getting soft.
- Add the minced jelly into the meat filling. Do your best to combine them together. The meat is quite sticky now and the jelly is very loose. So it will take a while to mix them well. Cover it. This need to go into the fridge because we don’t want it to melt in the room temperature.
- Now let make the other part of the filling - shrimp. For this recipe, I like to use small shrimp because they are cheaper compared to the bigger ones. And if do get the big shrimp, you still need to cut them into smaller size anyway. Just simply season it with 1/4 tsp of salt, 1/4 tsp of black pepper, a drizzle of olive oil, and 1/8 tsp of baking soda. Mix it everything and set it in the fridge as well.
THE SHENG JIAN BUN SKIN
In a large bowl, combine 400 g of all-purpose flour and 1/2 tsp of salt. Mix 1/2 tsp of dry yeast with 220 grams of water in a cup and pour it to the flour in batches. Use chopsticks to stir it at the same time. Knead it into a dough. It might be very rough and ugly in the beginning. That is ok. Just cover it and let it sit for 10 minutes.
- 10 minutes later, the dough will be much softer and playable. You can easily knead it smooth within 5 minutes. Transfer it on to a working surface. Keep kneading it. You want to get a smooth, shiny, elastic dough.
- Cover it. Let it proof. Most recipe out there will tell you to proof for 30 minutes. That is correct but I wouldn’t recommend it. Shengjian bun skin requires half proof dough. Overproof will cause soup leaking or other problems. I suggest you let it sit for only 10 minutes unless you are professional. Most people work slowly at rolling dumplings skins. The dough will keep raising while you are working with it so don’t worry about too much. If your room temperature is too hot or you feel like that the dough is getting soggy. Feel free to put it in the fridge to slow down the proofing process.
- Stretch and roll the dough into a long even strip. The recipe is enough for making 24 buns, so we are going to divide it into 24 even pieces.
- Dust some flour on them so they don’t stick to each other. Flatten them one by one with your palm. As I mentioned before if you feel like you gonna work slowly, save some of the dough pieces and set them in the fridge so it won’t be over raised.
- Now, you can take out the filling. Before we wrap the buns, add 1/2 cup of diced spring onion to the filling. I also reserved some spring onion to add at the end. I like to add the veggies ingredients to the filling the last so I can maximize the fragrance and freshness. Mix it well and we can make the Sheng Jian buns.
- Get a piece of small dough and a rolling pin. Flatten it a little more. Right-hand rolls it. Left-hand holds and turns the dough. Repeat this again and again until you get an around wrapper with a thin edge and thick middle. The size should be 10-11 cm across. Put some filling in the middle of the wrapper. Pack it tight because you don’t want to wrap too much air inside or else it might explode during cooking. Put a piece of shrimp on the top and you can start closing it. Lift and pinch the edge to make pleats. Use your left hand to help continue all the way around. In the end, twist the bun a little bit and pinch it to close the bun. It does need some practices to make it perfect. But it will be fine as long you can completely secure the filling inside.
THE SHENG JIAN BUN
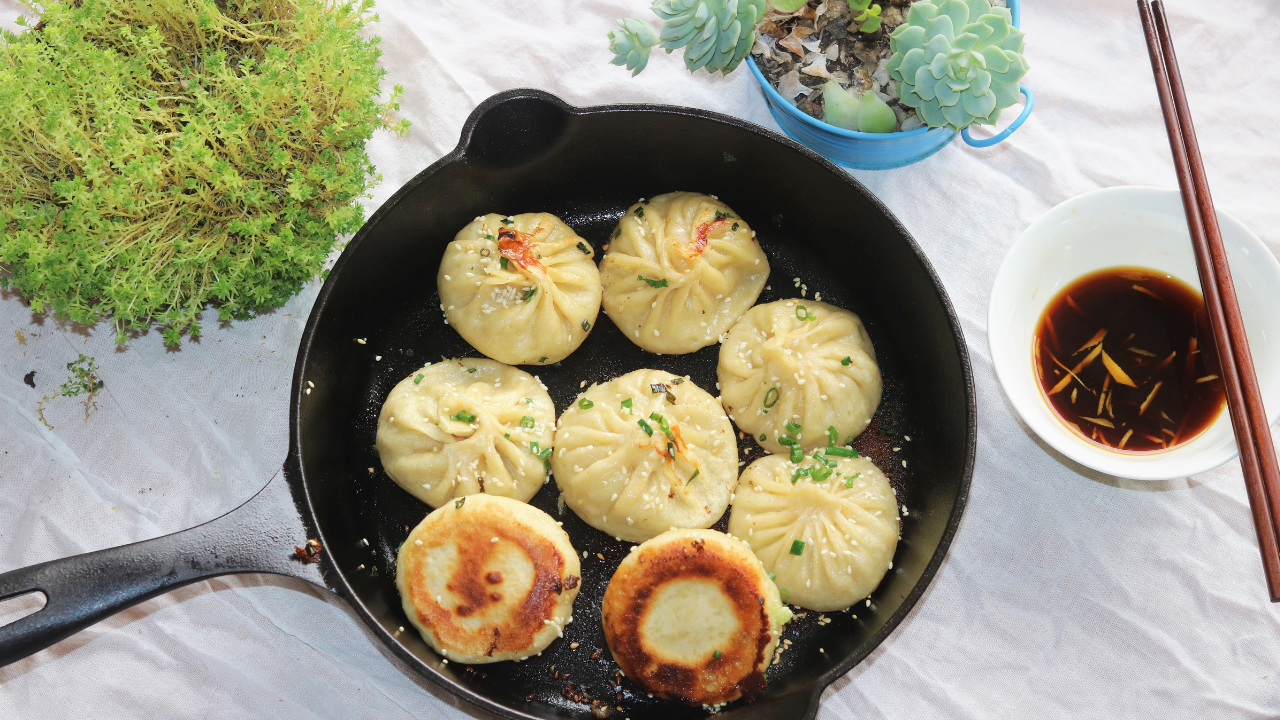
You want to use a heavy duty frying pan. I am using a cast iron skillet Heat up and add a generous amount of oil to cover the bottom. Don’t need to wait for oil to get hot. Place the Sheng Jian bun in. Make sure to leave some space between them because they will enlarge the size while cooking. When you see the edge of the buns starts sizzling, add some water, about 3-4 tbsp. There will be a lot of steam coming out immediately. Cover the lid and let it cook for 8-10 on medium heat or until all the liquid is gone.
- Open the lid. Sprinkle some spring onion and some sesame seeds for the nutty taste. By now, the bottom should be nicely crusty. You can check the bottom but don’t flip the buns over because the soup might leak while flipping and you will lose the best part of the buns. You can just serve it with the cast iron skillet. Because it is heavy duty, it will keep producing heat even it is off the stove, which will keep the bottom of the buns crispy for a while.
- Even though the buns taste amazing by itself, I want to introduce you a simple sauce - vinegar ginger sauce: 1 part of soy sauce, 2 parts of vinegar, and some ginger strips. It goes so good with this sheng Jian bun.
- Enjoy your meal! If you have any questions about the recipes, just post a comment, will help you out as soon as possible!


